
Charging Your Craftsman Series Vape
Ensuring your Craftsman Series vape is fully charged is crucial for optimal performance. A properly powered device delivers consistent vapor production, flavor, and battery life.
Using the Correct Charger
Craftsman Series vapes come equipped with a specific charging port. Always utilize the charger that came bundled with your device to avoid any potential damage or malfunction. This specialized charger ensures the correct voltage and amperage are delivered to the vape’s internal battery, maximizing its lifespan and performance.
Understanding Charge Indicator Lights
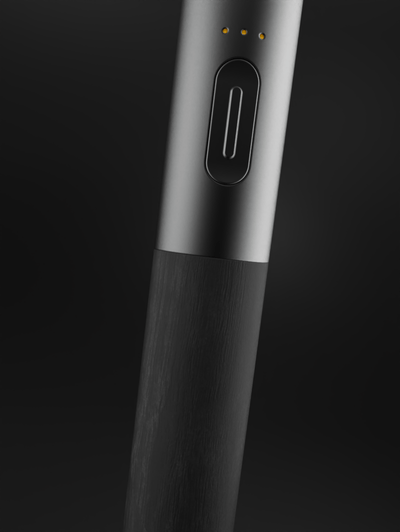
The Craftsman Series vape features a simple yet effective charge indicator system using colored lights.
A solid red light indicates that the device is currently charging.
When the light turns green, your vape is fully charged and ready to use.
Charging Time and Battery Life
The charging time for a Craftsman Series vape typically takes around 1-2 hours.
The actual time may vary depending on factors such as the device’s battery capacity and the charger’s output.
Battery life can also vary based on usage patterns, but you can generally expect a full charge to provide several hours of vaping time.
Assembling Your Craftsman Series Vape
Getting the most out of your Craftsman Series vape starts with proper charging. A fully charged device ensures consistent vapor production, optimal flavor, and extended battery life.
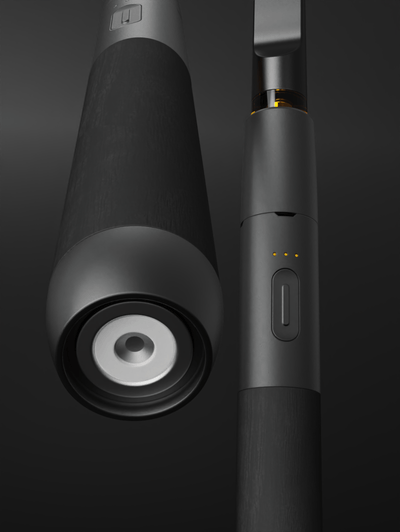
Connecting the Battery to the Tank
To connect the battery to the tank on your Craftsman Series vape, first ensure both parts are clean and free of debris. Align the threading on the battery with the corresponding threads on the tank. Gently screw the tank onto the battery until it is securely tightened, but avoid over-tightening which could damage the connection.
Once connected, you should feel a satisfying click indicating that the two components are properly aligned and sealed.
Installing Coils
Installing coils in your Craftsman Series vape is essential for delivering flavorful vapor. The process is relatively straightforward and can be done with a few simple steps.
Begin by carefully removing the old coil from the tank. This often involves unscrewing it from the base of the tank.
Next, examine your new coil and its packaging for any specific instructions. Most coils will have clear threading that aligns with the tank’s base.
Gently screw the new coil into place, ensuring it is firmly seated. Do not over-tighten as this can damage the coil or the tank.
After installing the coil, it’s crucial to prime it with e-liquid. This involves dripping a few drops of your chosen flavor onto the cotton wicking material inside the coil head.
Allow the coil to soak up the e-liquid for several minutes before firing your device.
Filling the Tank with E-Liquid
Filling the tank on your Craftsman Series vape is a straightforward process that ensures you’re ready to enjoy your favorite flavors. Begin by removing the top cap of the tank. You will see a filling port, often marked with a symbol indicating its purpose.
Using an e-liquid bottle, carefully pour your desired flavor into the filling port. Be mindful not to overfill; it’s best to stop when the e-liquid reaches just below the fill line indicated on the tank. Overfilling can lead to leakage.
After filling, securely replace the top cap, ensuring a tight seal.
Before taking your first puff, allow a few minutes for the e-liquid to saturate the coil. This ensures optimal flavor and vapor production.
Adjusting Your Craftsman Series Vape Settings
To unlock the full potential of your Craftsman Series vape, understanding how to adjust its settings is crucial. Properly configured settings will optimize your vaping experience, ensuring flavorful vapor, consistent performance, and extended battery life.
Temperature Control Options
The Craftsman Series vape offers several adjustable settings to tailor your vaping experience. These settings allow you to fine-tune temperature control, wattage output, and other parameters to achieve your desired vaping style.
- Temperature Control: Many Craftsman Series vapes feature a temperature control mode that lets you set the precise heating temperature. This is particularly beneficial for users who prefer specific temperatures for their e-liquids or want to avoid dry hits.
- Wattage Adjustment: You can often adjust the wattage output of your Craftsman Series vape, which directly impacts the amount of vapor produced and the intensity of flavor. Experiment with different wattage settings to find what suits your preferences.
Wattage and Voltage Adjustment
Adjusting these settings allows you to personalize your vaping experience. Begin by consulting your Craftsman Series vape’s user manual for specific instructions on accessing and modifying settings.
The process typically involves navigating through a series of menu options using the device’s buttons.
Once you’ve accessed the desired setting, use the button controls to increase or decrease its value until you achieve your preferred outcome.
Puff Timer and Preheat Function
The Craftsman Series vape features a puff timer that allows you to limit the duration of each inhale.
This function can be helpful for preventing over-inhaling and conserving battery life.
To adjust the puff timer, consult your device’s user manual, as the specific steps may vary depending on the model.
Generally, you will need to access the settings menu on your vape and locate the puff timer option.
From there, you can increase or decrease the time limit for each inhale to suit your needs.
The preheat function on a Craftsman Series vape is designed to quickly warm up the coils before taking a draw.
This can help improve flavor and vapor production by ensuring that the e-liquid is properly heated.
To activate the preheat function, look for a dedicated button or icon on your device.
The preheat duration may vary depending on the model, so refer to your user manual for specific instructions.
Optimizing Your Vaping Experience
Optimizing your vaping experience starts with understanding how to use your Craftsman Series vape effectively. A well-maintained and properly adjusted device delivers consistent vapor production, flavorful e-liquid hits, and extended battery life.
Finding Your Ideal Coil Resistance
Finding the ideal coil resistance for your vaping experience can significantly impact flavor, vapor production, and overall satisfaction. Coil resistance is measured in ohms (Ω) and refers to the opposition to electrical current flowing through the coil.
Lower resistance coils (e.g., 0.15 – 0.3 Ω) typically produce larger clouds of vapor and are best suited for sub-ohm vaping, which involves using higher wattage settings. These coils heat up quickly and deliver a more intense experience.
Higher resistance coils (e.g., 1.0 – 2.5 Ω) provide a tighter draw, produce less vapor, and are ideal for mouth-to-lung vaping, which simulates the feeling of traditional cigarettes. They require lower wattage and can produce a more flavorful vape.
The best coil resistance for you depends on your personal preferences and vaping style. Experiment with different resistances to find what suits you best. Consider factors like desired vapor production, flavor intensity, and battery life when making your choice.
Choosing the Right E-Liquid Viscosity
Choosing the right e-liquid viscosity is essential for a smooth and enjoyable vaping experience. Viscosity refers to the thickness or resistance to flow of an e-liquid.
Thicker e-liquids, also known as high-viscosity e-liquids, create denser vapor clouds but may require more power to vape properly.
They are often preferred by those who enjoy a stronger throat hit and larger clouds.
Thin or low-viscosity e-liquids offer a smoother draw and can produce a milder vaping experience.
These are generally easier on coils and provide a faster flavor delivery.
Experiment with different viscosities to find what suits your preferences and device best.
Understanding Airflow Control
Understanding airflow control is crucial for optimizing your Craftsman Series vape experience. Airflow refers to the amount of air that passes through the vape’s system, directly influencing vapor production, flavor intensity, and overall draw resistance.
Most Craftsman Series vapes feature adjustable airflow control mechanisms, usually located near the mouthpiece or base of the device. These can be in the form of sliding switches, rotating rings, or multiple air intake slots that you can adjust.
Experimenting with different airflow settings allows you to customize your vaping style.
- Closed Airflow: Restricting airflow creates a tighter draw and produces denser clouds with a more intense flavor. This is often preferred by mouth-to-lung vapers who enjoy a closer resemblance to traditional cigarette smoking.
- Open Airflow: Increasing airflow results in a looser, less restricted draw and produces larger, airier vapor clouds. This style is favored by those seeking a more pronounced inhale and voluminous clouds often associated with sub-ohm vaping.
The ideal airflow setting depends on personal preference and the type of vape experience you desire. Start with a moderate setting and gradually adjust it until you find the sweet spot that delivers your preferred flavor, vapor density, and draw resistance.
Shop Premium Vessel Craftsman Vape Pens with Exclusive Offers
- Why Breadcrumbing Can Be A Form Of Emotional Manipulation - November 12, 2025
- What Is The Alternative To Filler For Nasolabial Folds? - November 10, 2025
- What Age Do You Have To Be To Get Lip Filler - November 7, 2025